Showing posts with label Reggio Emilia. Show all posts

Monday, August 1, 2016

Art with Modeling clay/Plasticine for preschoolers

When in-between projects or inquiries, the twins spend time exploring a new art medium or work on developing their skills such as drawing, painting, writing etc. They use these skills to express their understanding of a subject. These skills also help them express or communicate their ideas in many dimensions.

One such developing skill is clay work. It is our favorite and helps tremendously with fine motor development.We have recently started exploring Modeling clay. Modeling clay is very similar to play dough. It is a bit firmer and doesn't dry up or crumble. The main idea behind introducing this clay is to help them develop the skill of building models.

The twins started to use clay just like play dough - rolling, stamping, making balls etc. Slowly 3D structures started to emerge.


A bird's nest by Nidhi
They were presented with a box of  spicebox's "Fun with clay" for their fourth birthday by their dear friends. It contained few boxes of clay,  few sculpting tools,few wacky body parts such as eyes, feet etc, and an instruction booklet. They had great time making robots, monsters, race cars etc. It was a go to activity for many days.
Sid's race car
Sid's race car
A squirrel by Nidhi
A squirrel by Nidhi

I came across a famous author Barbara Reid's tutorial on Plasticine art and thought Sid and Nidhi might enjoy this art.

We watched Barbara Reid's tutorial videos and they were excited to make their own.

Here is a mini tutorial.

Materials Needed:

1. Work surface - Use a thick surface such as canvas board, cardboard, wood, plexiglass, cd case etc.
2. Modeling clay - Different colors - I provided the clay in small bits to help them manipulate it easily.
3. Sculpting tools
4. Pencils for sketching

Instructions:

1. Decide on the design. A pencil sketch of the art to be created will be helpful. Nidhi decided on creating a group of friends on a lawn. She sketched her plan on her drawing book.
Nidhi's design sketch
2. Draw outlines of the design on canvas board. Sid decided to create vehicles and drew them on the canvas using pencil.

3. Decide on back ground colors and apply the plasticine as thin layer. Required colors can be made by mixing and kneading basic colors.
Sid's outline of vehicles
4. Roll out snakes of clay to form outlines.
Rolling out outline for road
5.  Mould required shapes first and apply them wherever required.  Layer them as required.
Nidhi's depiction of sky with white clouds
6. Textures can be applied by using pencils, toothbrush or modeling tools. Sid uses similar techniques to add facial expressions to his characters.
Applying texture to soil with pencil
A few pictures of their finished art.
Nidhi's cast of Cinderella story
Nidhi's group of friends in a ground
Nidhi's "group of friends in a ground"

Sid's "parade of cars"

A car with driver
A car with driver
A dumptruck
A dumptruck
A boy riding a car

A girl driving a truck

An excavator with crawler tracks


The complete picture by Sid
Have you tried a different technique with a known art medium?

"The wider the range of possibilities we offer children, the more intense will be their motivations and the richer their experiences." - Loris Malaguzzi

Sunday, July 24, 2016

Recyclables and creativity - Inquiry on recycling

We have been enjoying a great summer. Attending local library events has become our weekly routine. During one such event there was an announcement for bike decorating contest/parade. "Mom I want to decorate my bike and go for the parade." , declared Nidhi. However Sid was reluctant.
We gathered more information about the event. The main rule to the contest and parade was that the participants must decorate their bikes with recyclables and recycled materials.


I was skeptical about Nidhi sticking to such rules for decorating her bike. I explained to her. "You cannot use any materials to decorate. You should use only recyclables. Are you sure you still want to do it?". The answer was as predicted , "Yes Mom, I want to do it. But what are recyclables?".

What a perfect opportunity to explore about recycling! I could sense that her excitement was more about decorating her bike rather than studying about recycling.

We started by learning what are recyclables. We opened our recycling bin at home and checked what materials have been accumulated. There were lots of plastic water bottles, cardboard boxes, cereal boxes etc. I asked them to find out if there were more materials that we could use in the house that are recyclables.
"How do we know if a thing is recyclable? " asked Nidhi.
We watched a few you tube videos to understand what is recycling and recyclable materials. Then they both went on scavenger hunt around the house hunting materials with recycling symbols on them.

Now with the materials gathered, the focus shifted to planning the decor. Sid had a big vision of building a big cardboard box bull dozer. He tried painting a couple of paper plates for wheels, arranged a few cardboard boxes but eventually gave up on his plan as he found it difficult to implement his vision with the materials he had at hand.

Nidhi was persistent. "I want to decorate my bike with flowers and butterflies!" , she announced. She quickly drew up her vision on paper. How impressive!

Nidhi's Flower Design plan for bike decor

She brought the water bottles and thought up of using the bases as flowers. She cut up the petals and attached them to the bases.
Water bottle base flower making in progress


They both enjoyed painting the empty bottles and cutting them up into spirals that would be used as streamers.

Painting empty water bottles to make streamers

Nidhi found a cardboard tube which she decorated with felt shapes.
Cardboard tube decor with felt shapes

For making butterflies, we got inspiration from coffee filter butterfly craft.

Sid brainstormed a lot of ideas and settled upon robots. I set up a provocation with loose parts to inspire his design. Here is a photo journal of their tin can robots.
Sid's Tin Robot Monster

Nidhi's Tin can Robot made with loose parts
Finally, the bikes decorated completely with only recyclables.
Nidhi's Green Garden Bike
Sid's robot bike is made of a cereal box covered with aluminum foil, paper plates and water bottle parts.
Sid's Green Robot Bike

Here are the kids at the parade.
Sid and Nidhi at the parade

This project has resulted in lot of learning. The most important point of this whole project is that it was a totally child led, self directed learning.
1. The twins learnt about recycling and recyclables. They continue to identify recyclables, recycling bins and sort their things to be thrown out into recycling bin and trash bin correctly. What better way to start caring for the environment!
2. They learned persistence. This project presented them with lot of problem solving challenges.
3. They learned to sustain a task for long period. Their typical focus period doesn't last more than a day normally. But tasks of this project was carried out with vigor for over a week.
4. Nidhi has started to present her designs through her drawing representations. Notice how closely her bottle flower resembles her paper design.
5. They learnt about contests, parades and that contests are not only for winning but also for enjoying the process.

"Children make their own paths into the unknown, paths we would never think of making for them." - John Holt

What new learning path did you and your child venture into this summer?

Wednesday, July 6, 2016

Encouraging creativity with TinkerBox

"To invent you need a good imagination and a pile of junk." - Thomas Edison
Have you ever noticed what kids do when they are given a pile of junk? Junk, not toys. Just Junk. Surprise!  They start to tinker with the pile in million ways we never would have thought about. This tinkering encourages them to think critically, solve problems, and most importantly stay creative.

What is tinkering?
To quote The Exploratorium "tinkering is thinking with your hands and learning through doing. It’s slowing down and getting curious about the mechanics and mysteries of the everyday stuff around you."

What is a Tinker box?
 A tinkerbox (also known as Tinker tray) at our house, is a simple divided box with various loose parts. You can read more about loose parts play and creativity in a post written a few months back.  So, when in mood to play with something new or just tinker with something, tinker box is our go to resource.

A divided box containing loose parts
The Tinker Box

What is in our tinker box?
1. Rings and Sticks
2. Googly eyes - adds a character to anything it is attached to instantly.
3. Straws
4. Pipe cleaners/chenille sticks or wires
5. buttons and beads
6. Popsicle sticks/ craft sticks
7. Feathers
8. Push Pins
9. Yarn/String
10. Pattern blocks/shapes
11. Bonding materials such as tapes,glue and rubber bands
12. cardboard tubes and recyclables

Basically, a tinker box can comprise of any number of familiar, interesting materials left to be used in unfamiliar ways.

If tinker box contains craft items then what is the difference between tinkering and crafting for preschoolers?

Both tinkering and crafting are about making something. But in tinkering, you do not follow stepwise instructions to achieve a neat end result. When tinkering, the end result may reveal as you go.

How to initiate and maintain interest in tinkering?

If a new material is added to tinkerbox or tinkerbox is just being introduced, I would set up provocations displaying a few ways the materials can be used creatively.
A small provocation setup by me
To sustain kids' interest, I add other open ended materials such as play dough, paper and coloring materials etc.
I also rotate materials according to the kids current interest if the box goes unnoticed for some time.Say, the kids are currently interested in cars, adding materials for wheels (like bottle caps) and axles (sticks or skewers) can help bring their interest back to tinkering.


So what do Sid and Nidhi do with their tinkerbox?


Creative Expression
Sid and Nidhi enjoy using loose parts in the tinker box for expressing their creative thoughts, for story telling and to retell their experiences.

Here is Sid's depiction of a juggler after visiting a juggling show.
A juggler balancing on a ring by Sid

 Here is a story told by Nidhi about two little girls trying to find their way home. She also documented her representation as drawing on paper.

Girls walking on road by Nidhi


For Pretend/Imaginative play:

A simple tinkering of cardstock paper with couple of pipe cleaners can transform them into little prince and princess.

Prince and Cinderella with their self made crowns

Add a pair of googly eyes and you get an instant pretend companion.

Look! My little car is drinking juice(petrol)

Here is a short video of Sid singing with a  Banjo built by him and Nidhi listening to the song with her pretend headphones and mike.


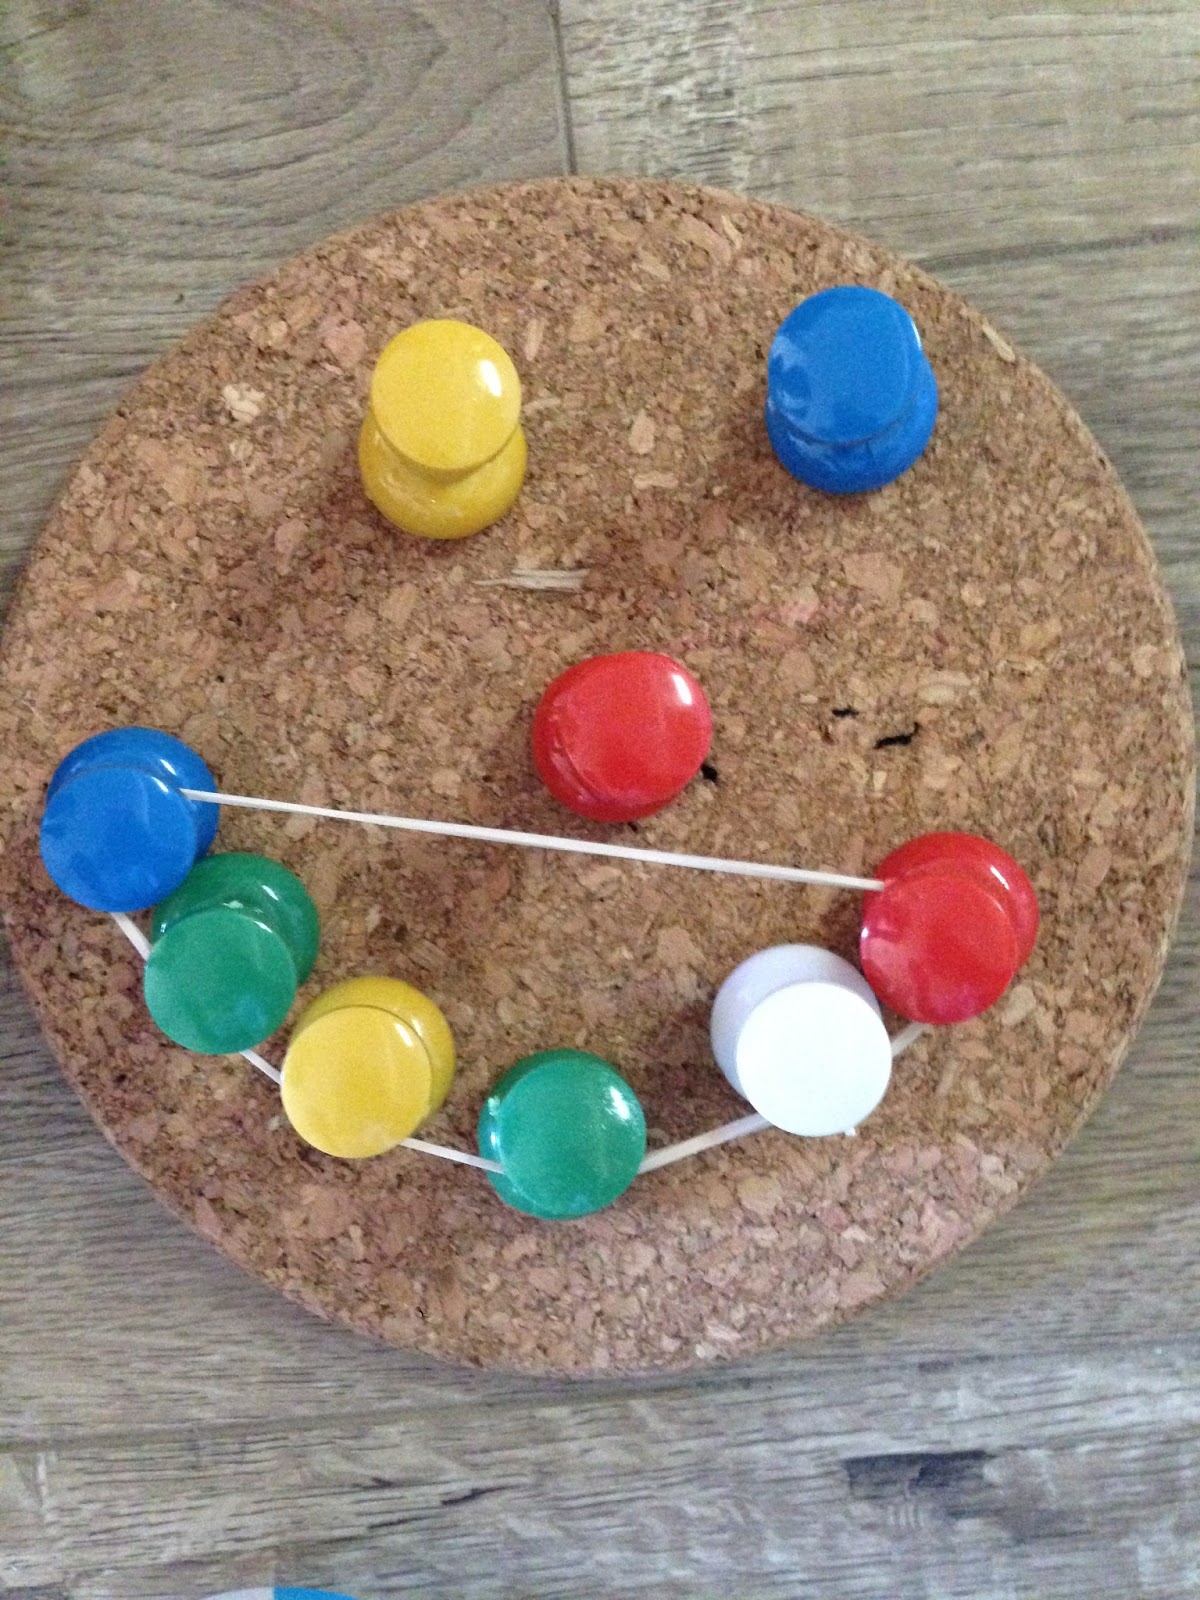
Here is Sid playing a banjo made with cork board, a train track, push pins and rubber bands.
Sid playing a DIY banjo

For Preschool Math and literacy learning:

Though this way of using loose parts may not contribute towards tinkering, it reinforces versatility of tinker box.
Nidhi building alphabets with popsicle sticks

Sorting buttons by colors
Preschool Engineering:
Nidhi trying out a pulley system

Piggy's straw house
Piggy's straw house


Art projects:
Often just having fun results in amazing art products like this mobile made by Nidhi hanging elegantly in our room.
A mobile made of loose parts from the tinker box


Another hanging mobile in making

And more importantly having fun!


A happy face with pins and rubber band
Do you have a tinker box for your preschooler? What's in it? Share your thoughts.

“The creative process in tinkering, I believe, lets your mind escape from the day-in and day-out of life. And I think it's so important, when we’re building something, to escape.” – Scott Weaver


Tuesday, April 12, 2016

How to make brown? - A color mixing experiment

We have been enjoying painting indoors during the series of rainy days for the past few weeks. I normally set out only  primary colors of tempera paint and let the kids explore color mixing. So now, the twins have enough practice of mixing secondary colors on their own.

One evening when painting, Sid wondered, "Mom! How to make brown?" Now that is an interesting question. Till a few months back his process arts have mostly ended up a big mess of mushy brown. But now he wants to mix brown intentionally. I considered this as an opportunity for them to explore beyond secondary colors. Moreover I too wondered how to mix brown.

We started to explore. I suggested them to start by mixing secondary colors. Here is a photo journal of our color mixing experiment.

An invitation to color mixing experiment

Nidhi started by mixing red and yellow to make orange.

Mixing orange
When you mix red and yellow it makes orange
She then moved on to make this beautiful green by mixing blue and yellow.

Mixing green
A lovely green
A lot of sampling was done to get the purple color she intended.

Mixing purple
Getting the desired purple shade is a big task

Secondary colors
Our secondary colors all mixed and ready
Sid took the entire time exploring to get brown. He suddenly announced  with excitement, "Look Mom! I made brown by mixing red, blue and yellow." I love to see the amount of effort that went into his discovery of brown.

Brown is discovered
Eureka! Brown is discovered!
I then wondered aloud "Can we make brown with secondary colors?". The twins happily considered the challenge and off they went in search of other shades of brown.
Sid exclaimed, "I made this brown with mixing purple and yellow". Nidhi said, "I made this brown by mixing purple and green!".
"When I mixed this purple, orange and yellow, I got this brown!", exclaimed Nidhi.

We ventured into tertiary colors.They noticed that the color shades varied when mixed with other colors. Nidhi figured that purple when mixed with blue made dark purple and green and blue made dark green. 

Experimenting tertiary colors

Here is our experiment left to dry overnight.

Many shades of brown
The many shades of brown
The next morning the kids observed that the painting had dried and an interesting conversation ensued.

Nidhi: The paint was wet yesterday. Now it is dry.
Me: It was wet because it had water in it. Now, where did the water go?
Sid( after some thought) : The paper has holes in it and water went to drain through the hole.
Interesting! Thinking in lines of absorption.
Nidhi: I think the water flew and went into smoke alarm.
 That's a simple explanation of evaporation!

I love little kids' imagination. In their own little world, as Pablo Picasso said 
"Everything you can imagine is real!"